South Coast Sailboats
Replacing the keel cable
I have replaced my keel cable twice. Once
because the original cable simply wore out. The second time because
I used the wrong material when replacing the first cable. When
using metals under water, certain observations must be observed.
Try not to use dissimilar metals together,
this causes a battery effect, creating electrical current as one
of the metals dissolves and corrodes away to nothing. Cases in
point, I had used galvanized steel cable with aluminum crush fittings
to affect the first keel cable replacement. Before the end of
the season (less than six weeks later), the aluminum swedges had
all but disappeared, and the ¼" galvanized steel cable
was all but completely shot.
The only suitable cable for under water use
is stainless steel cable.
When using crush or swedged fittings, use
only copper or nicopress fittings. Aluminum will dissolve like
an Alca-Seltzer tablet.
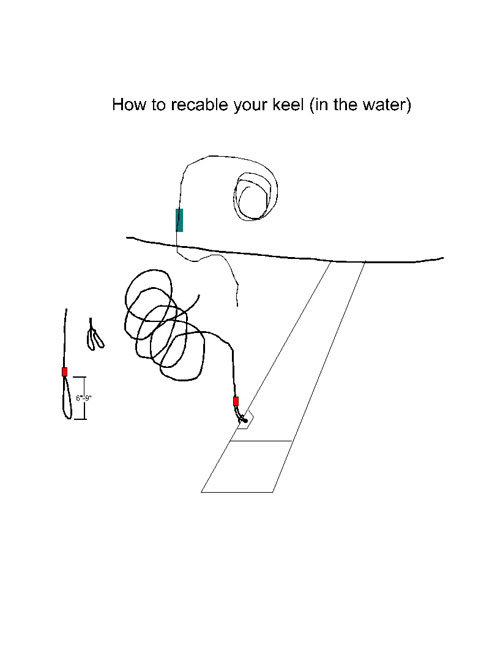
How to deal with the old and new cables: These
instructions assume boat is in the water
1. Cut away all old cable, remove all traces
from the keel as well as the winch. Also, if your winch is in
really poor condition, for as little as $16.00 you can purchase
a brand new winch to put in place of the old one.
2. Take full length of new stainless steel cable and create a
loop at on end. The loop should not exceed 6-9 inches. Use one
copper or nicopress fitting and crush fitting with proper tool
or adapted tool. You might also consider coating the whole cable
with waterproof grease (this helps to minimize corrosion as well
as easy the cable when under load).
3. Time to get into the water (preferably in water deep enough
to let the keel hang all the way down). Preferably, using a mask
so you can see. Take the loop end of the cable and squeeze the
loop flat as possible. Now send the loop through the cable-mounting
hole in the keel. Next, take the opposite end of the cable and
pull it completely through the loop end of the cable (make sure
you pull the swedged cable crimp through the loop as well. When
pulled into position, this is how the lower end of the cable will
look.
4. Take the loose end of the cable to the surface and get some
air. The most difficult part is already done.
5. From the inside of the boat, feed a fish tape or other line
down into the tube that the keel cable needs to come up through.
From under the boat, retrieve the fish tape and bring the end
back to the surface.
6. Join or splice the fish tape and the keel cable together with
electrical tape.
7. From inside the boat, pull back the fish tape to retrieve the
keel cable, and pull tight to remove all slack under the boat.
8. Now you must cut the cable to size and mount it to the winch.
Figure that you want to add at least three complete wraps of
cable on the winch before you start pulling up the keel. Cut
the keel cable at the right length and secure it to the winch.
9. Begin to crank the cable onto the winch, guiding the first
couple of wraps into position with your fingers.
10. Once the cable has tightened up, you should then be able to
crank the keel all the way up to the retracted position, and you
would then be finished.